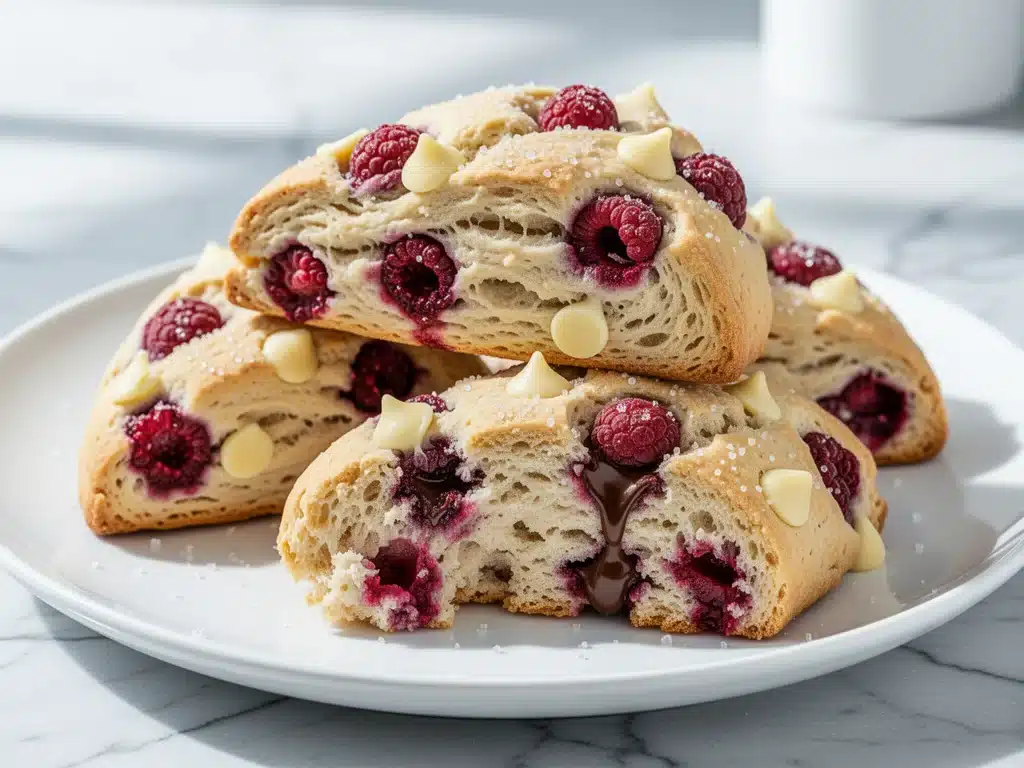
It was one of those rainy Tuesday mornings when my husband, Mike, came home from his early shift and announced he was craving something “bakery-style” for breakfast. I’ll be honest—I groaned. Not because I didn’t want to make him happy, but because I had just spent $8 on a single scone from that trendy shop downtown, and it was basically a dry brick with a couple of sad dried cranberries stuck to the top. It wasn’t breakfast. It was a punishment.
That’s when I decided enough was enough. I was tired of paying premium prices for undercooked centers and overly sweet dough. I wanted the flaky, buttery, crumbly goodness you get from a high-end patisserie, but with chunks of white chocolate that actually melt and fresh raspberries that burst with flavor. I wanted scones that were better than takeout, better than the store-bought kind, and honestly, better than most places selling them.
So, I went into the kitchen. I had flour, butter, sugar, heavy cream, and a bag of frozen raspberries in the freezer. I thought, how hard can it be? Well, it turns out, it’s not hard—but it is technical. If you overwork the dough, you get tough scones. If you use warm butter, you get greasy pancakes. If you skip the cold cream, you get dense rocks. But once I cracked the code? These bakery-style raspberry white chocolate scones became our weekend ritual. They are tender, they are rich, and they smell like heaven when they bake. I’ve made this recipe at least thirty times over the last year, tweaking the ratios until they were absolutely perfect. And now, I’m sharing the exact method so you can stop buying sad scones and start making amazing ones.
Why You’ll Love This Raspberry White Chocolate Scone Recipe
There are a lot of scone recipes out there. Some are too sweet, some are too dry, and some require ingredients you have to drive twenty minutes to find. This recipe is different. It’s the one I pull out when I want to feel like a pro baker without the stress. Here’s why these raspberry white chocolate scones have completely taken over our kitchen:
- Actually Flaky, Not Dense — Most people think scones are just sweet biscuits. They’re not. A true scone is tender and crumbly with distinct layers. This recipe uses a specific folding technique that creates those beautiful, bakery-style layers. I tested this against the “cut-in” method, and the folding method wins every single time.
- Perfect Sweetness Balance — White chocolate is sweet. Raspberries are tart. The dough is lightly sweetened. The result? A balanced bite that isn’t cloying. They taste indulgent but not like a dessert (though they taste like one). I’ve served these to my tea-obsessed aunt, and she said they’re better than the ones she buys at the airport.
- Quick and Easy — From start to finish, these take about 35 minutes. That includes mixing, chilling, shaping, and baking. No fancy equipment needed. No stand mixer required. Just a bowl, a fork, and a bit of elbow grease.
- Freezer-Friendly — This is the game-changer. You can freeze the raw dough disks before baking. When you want fresh scones on a busy Tuesday, you just pull one out, let it thaw for an hour, and bake. It’s like having a bakery in your freezer. I keep these frozen all winter long.
- Uses Simple Ingredients — You probably have everything you need right now. Flour, sugar, baking powder, salt, cold butter, heavy cream, eggs, vanilla, white chocolate chips, and raspberries. No weird stabilizers or preservatives.
This recipe has saved our weekend mornings. Instead of rushing out to a crowded cafe, we stay in our pajamas, brew coffee, and enjoy these warm, fragrant treats. It’s the little things that make the biggest difference in daily life.
Ingredients You’ll Need
Here’s the best part: this ingredient list is short, simple, and mostly pantry staples. I’m particular about a few things here, so pay close attention to the butter and the fruit.
For the Dough Base
All-purpose flour (2 ½ cups / 315g) — Don’t use cake flour or bread flour. All-purpose is the sweet spot for structure. If you don’t have a scale, spoon the flour into the cup and level it off. Don’t scoop directly, or you’ll pack it down and get dry scones.
Granulated sugar (⅓ cup / 65g) — Yes, only a third of a cup. The white chocolate provides plenty of sweetness. If you like them sweeter, you can bump it to ½ cup, but I find ⅓ cup lets the raspberry flavor shine.
Baking powder (2 teaspoons) — This is what makes them rise. Make sure it’s fresh! If your baking powder is older than six months, it might not have enough lift. I buy a new box every few months just to be safe.
Salt (½ teaspoon) — Essential for flavor. It cuts through the sweetness of the chocolate and cream. Don’t skip it.
Unsalted butter (½ cup / 115g, cold and cubed) — This is non-negotiable. The butter must be ice-cold. If it’s soft or room temperature, it will melt into the flour instead of creating steam pockets. I keep my butter in the fridge until the minute I start mixing. Some recipes call for grated butter, but I prefer cubed so I can see the pieces clearly.
For the Wet Ingredients

Heavy cream (¾ cup / 180ml) — Use full-fat heavy cream. Half-and-half or milk will make the scones dry and tough. The fat content is what gives them that tender, rich crumb. I keep a carton of heavy cream in the fridge specifically for baking like this.
Egg (1 large, beaten) — Just one egg. It binds the dough. Beating it first makes it easier to mix evenly.
Vanilla extract (1 teaspoon) — Pure vanilla, please. I know it’s expensive, but the artificial stuff leaves a weird aftertaste in delicate baked goods.
The Star Players
Fresh or frozen raspberries (1 ½ cups) — This is where it gets interesting. Fresh raspberries are great, but frozen ones actually work *better* for scones. Why? Because frozen berries stay intact longer in the dough and don’t bleed as much color. If you use fresh, toss them in a little flour first to prevent them from sinking. If you use frozen, do not thaw them! Throw them in straight from the freezer. Thawed berries will turn your dough pink and soggy.
White chocolate chips or chunks (1 cup / 170g) — I prefer chunks over chips. Chips melt too quickly and sometimes disappear. Chunks stay in place and give you those gorgeous pockets of gooey chocolate. If you can’t find chunks, chop a bar of white chocolate into small pieces. High-quality chocolate makes a huge difference—look for bars with cocoa butter, not vegetable oil.
Equipment Needed
You don’t need anything fancy for this. Here’s what I actually use:
Large mixing bowl — I use a 4-quart stainless steel bowl. It’s big enough to fold the dough without making a mess.
Pastry cutter or fork — To cut the butter into the flour. A pastry cutter is nice, but a sturdy fork works just as well. I use a fork because I don’t want to wash another tool.
Bench scraper — This is my secret weapon. It helps me lift the sticky dough without sticking to my hands. If you don’t have one, a rubber spatula works.
Baking sheet — Any standard sheet pan. Line it with parchment paper for easy cleanup. I’ve tried silicone mats, but parchment gives me more consistent browning.
Parchment paper — Essential. Don’t grease the pan; just line it. The butter in the dough is plenty.
Knife — A sharp chef’s knife for cutting the dough into wedges. A dull knife will squash the dough instead of cutting it cleanly, which affects the rise.
Cooling rack — To cool the scones evenly. If you leave them on the hot pan, the bottoms get soggy.
How to Make It: Step-by-Step
Alright, let’s make these scones! I’m walking you through exactly how I do it, including the little tricks I’ve picked up over dozens of batches.
Step 1: Prep Your Oven and Pan (5 minutes)
Preheat your oven to 400°F (200°C). This is a high temperature, and it’s crucial. The heat needs to hit the cold butter immediately to create steam and lift. Line your baking sheet with parchment paper. Have it ready before you start mixing.
Step 2: Mix the Dry Ingredients (2 minutes)
In your large bowl, whisk together the flour, sugar, baking powder, and salt. Make sure there are no lumps of baking powder. This ensures even rising. I usually whisk it for about 30 seconds just to be thorough.
Step 3: Cut in the Butter (3-4 minutes)
Add the cold, cubed butter to the dry ingredients. Here’s the trick: use your pastry cutter, fork, or even your fingers to work the butter into the flour. You want the mixture to look like coarse crumbs with some pea-sized pieces of butter remaining. Those butter pieces are what create the flaky layers. Don’t overwork this! If the butter melts, you’ve gone too far. If it’s too uniform, your scones will be dense.
Step 4: Add the Wet Ingredients (2 minutes)
In a small bowl or measuring cup, whisk the egg and vanilla together. Pour this into the flour mixture. Then, pour in the heavy cream. Use a fork or a spatula to gently fold everything together. Stop as soon as the dough comes together. It will look shaggy and messy. That’s okay. Do not knead it. Overmixing develops gluten, and we don’t want gluten in scones. We want tender.
Step 5: Fold in the Berries and Chocolate (1 minute)
Turn the dough out onto a lightly floured surface. Sprinkle the frozen raspberries and white chocolate chunks over the dough. Gently fold the dough over itself a few times to distribute the mix-ins. Again, be gentle. You just want them evenly spread, not crushed.
Step 6: Shape the Dough (5 minutes)
Gently pat the dough into a circle about 1-inch thick and 8 inches wide. You want it even. If it’s lumpy, the scones will bake unevenly. Use your bench scraper or knife to cut the circle into 8 wedges. Cut all the way through. This is where the shape matters—round wedges bake more evenly than squares.
Step 7: Chill (Optional but Recommended) (15-30 minutes)
Place the baking sheet with the cut scones in the fridge for 15-30 minutes. This re-chills the butter before it hits the oven. If you skip this, the butter might melt too fast, and you’ll lose some of that flakiness. I know it’s tempting to bake them right away, but trust me—this step makes a difference.
Step 8: Bake (18-20 minutes)
Bake in the preheated oven for 18-20 minutes. The scones should be golden brown on top and firm to the touch. If they’re still pale, give them another 2-3 minutes. But don’t overbake, or they’ll dry out. The edges should be lightly golden, not dark brown.
Step 9: Cool and Serve
Let the scones cool on the pan for 5 minutes, then transfer to a wire rack. They are best eaten warm, but they’re also great at room temperature. Dust with powdered sugar if you want to look fancy, but honestly, they’re perfect as is.
Expert Tips & Tricks
Here’s everything I’ve learned from making these dozens of times. These tips will save you from my mistakes.
- Keep Everything Cold — This is the #1 rule. Cold butter, cold cream, cold bowl. If your kitchen is hot, put your bowl in the fridge for 10 minutes before mixing. Warm ingredients = greasy, dense scones.
- Don’t Overmix the Dough — I know it’s tempting to smooth it out. Don’t. The dough should look shaggy and uneven. The more you handle it, the tougher it gets. Handle it like a fragile egg.
- Use Frozen Raspberries — I can’t stress this enough. Fresh raspberries release too much water. Frozen ones hold their shape and add bursts of tartness without making the dough soggy. Just don’t thaw them!
- Chill Before Baking — I know it’s an extra step, but chilling the shaped dough ensures the butter stays solid until it hits the heat. This creates better lift and flakiness.
- Brush with Cream — For a bakery-style golden top, brush the tops with a little extra heavy cream before baking. It helps them brown evenly and gives that shiny, professional look.
Common Mistakes (and how to avoid them)
Mistake: Scones are flat and dense. Fix: Your butter was too warm, or you overmixed the dough. Next time, keep everything colder and handle the dough less.
Mistake: Scones are dry and crumbly. Fix: You overbaked them. Check them at 18 minutes. They should still feel slightly soft in the center. They will firm up as they cool.
Mistake: Berries sank to the bottom. Fix: You used fresh berries without tossing them in flour, or you mixed too vigorously. Use frozen berries, or toss fresh ones in 1 teaspoon of flour before folding them in.
Variations & Substitutions
Once you’ve nailed the basic version, here’s how you can mix it up. I’ve tried all of these.
Lemon Blueberry Scones — Swap the raspberries and white chocolate for 1 ½ cups fresh blueberries and the zest of 1 lemon. Add 1 tablespoon of lemon juice to the cream. It’s bright and refreshing.
Double Chocolate Scones — Add 2 tablespoons of cocoa powder to the dry ingredients. Use semi-sweet chocolate chunks instead of white. For chocolate lovers, this is the one.
Gluten-Free Option — Use a 1:1 gluten-free flour blend. The texture might be slightly more tender, but it works well. Make sure your baking powder is gluten-free.
Dairy-Free Version — Use cold vegan butter (like Miyoko’s or Earth Balance) and full-fat coconut cream instead of heavy cream. The flavor will be slightly coconutty, but it’s still delicious.
Orange Poppy Seed — Add 1 tablespoon of poppy seeds and the zest of 1 orange to the dry mix. Skip the berries. Drizzle with an orange glaze after baking.
Serving & Storage
How to Serve: I usually serve these warm with a cup of black coffee or Earl Grey tea. They’re perfect for brunch, weekend breakfast, or even an afternoon snack. If you’re having guests, set up a topping bar with extra white chocolate chips, raspberry jam, and clotted cream.
Refrigerator: Store leftovers in an airtight container for up to 3 days. They’ll stay moist, but they’re best eaten fresh.
Freezing: These freeze beautifully. You can freeze baked scones for up to 3 months. Let them thaw at room temperature or warm them in the oven at 350°F for 10 minutes. Or, freeze the raw dough wedges on a baking sheet, then transfer to a freezer bag. Bake straight from frozen, adding 5-7 minutes to the bake time.
Reheating: Never microwave scones if you can help it. It makes them chewy. Reheat in the oven or toaster oven to restore that flaky texture.
Nutrition Information
I’m not a nutritionist, but here’s the breakdown if you’re tracking. This is a rich treat, so enjoy in moderation.
Per Scone (based on 8 servings):
- Calories: 380
- Protein: 5g
- Carbs: 42g
- Fiber: 2g
- Sugar: 18g
- Fat: 20g
- Saturated Fat: 12g
These scones are higher in calories due to the butter, cream, and white chocolate. But they’re also satisfying, so one is usually enough. If you want to lighten it up, you can reduce the sugar to ¼ cup and use semi-sweet chocolate, but you’ll lose that classic bakery sweetness.
Final Thoughts
So, there you have it—my go-to bakery-style raspberry white chocolate scones. I’ve probably talked your ear off at this point, but when you make a recipe this often, you have a lot to say about it. These scones have saved our weekend mornings. They’re my answer to “what’s for breakfast” when I want something special but don’t want to leave the house. My kids are happy, my husband’s happy, and I’m happy because I’m not stressed about cooking.
Make it yours! Try different fruits, swap the chocolate, or add a glaze. The best recipes are the ones you adapt to your family’s tastes. If you make this, drop a comment and let me know what you think! I love hearing how recipes turn out in your kitchen. And if something doesn’t work, tell me that too—I’m here to help troubleshoot.
Happy baking! And I hope your kitchen smells half as good as mine does right now.
Frequently Asked Questions
Can I use fresh raspberries instead of frozen?
Yes, but there’s a catch. Fresh raspberries have more water content, which can make the dough soggy and cause the berries to bleed color. If you use fresh, toss them in 1 teaspoon of flour before folding them into the dough. This coats them and helps prevent sinking. Also, be gentler when mixing to avoid crushing them. Frozen berries are actually better for structure, but fresh works if you’re careful.
Why did my scones turn out dry?
This usually happens for two reasons: overmixing the dough or overbaking. If you knead the dough like bread, you develop gluten, which makes scones tough and dry. Also, check your oven temperature. Ovens vary. If your scones are browning too fast but still raw inside, your oven might be too hot. Try checking them 2-3 minutes earlier than the recipe suggests.
Can I make the dough ahead of time?
Absolutely. This is my favorite way to prep. Shape the scones, place them on the baking sheet, and cover tightly with plastic wrap. Store them in the fridge for up to 24 hours. When you’re ready to bake, just pop them in the oven. You might need to add 2-3 minutes to the bake time since the dough is cold. Alternatively, freeze the raw dough for up to 3 months.
Do I need to chill the dough before baking?
I highly recommend it. Chilling re-solidifies the butter, which creates steam pockets when the scones hit the hot oven. This lift is what gives you those tall, bakery-style tops. If you skip this step, the butter might melt too quickly, and the scones will spread flat. It’s an extra 15 minutes, but it’s worth it for the texture.
Can I use milk instead of heavy cream?
You can, but the scones will be less rich and slightly drier. Heavy cream has a high fat content, which is crucial for tenderness. If you must use milk, use whole milk, and consider adding 1 tablespoon of melted butter to the milk to boost the fat content. But honestly, if you want bakery-quality scones, stick with heavy cream. It’s worth the indulgence.
How do I store leftover scones?
Store them in an airtight container at room temperature for up to 3 days. If you live in a humid climate, you might want to refrigerate them, but they’ll dry out faster. To refresh them, warm them in the oven at 350°F for 5-10 minutes. Never microwave them if you want them to stay flaky.
Pin This Recipe!


Bakery-Style Raspberry White Chocolate Scones
- Total Time: 35 minutes
- Yield: 8 servings 1x
Description
Tender, flaky, and rich homemade scones loaded with fresh raspberries and white chocolate chunks. This recipe uses a folding technique for perfect layers and requires simple pantry ingredients.
Ingredients
- 2 ½ cups all-purpose flour
- ⅓ cup granulated sugar
- 2 teaspoons baking powder
- ½ teaspoon salt
- ½ cup unsalted butter, cold and cubed
- ¾ cup heavy cream
- 1 large egg, beaten
- 1 teaspoon vanilla extract
- 1 ½ cups frozen raspberries
- 1 cup white chocolate chips or chunks
Instructions
- Preheat oven to 400°F (200°C) and line a baking sheet with parchment paper.
- In a large bowl, whisk together flour, sugar, baking powder, and salt.
- Add cold cubed butter to the dry ingredients and work it in using a pastry cutter or fork until the mixture resembles coarse crumbs with pea-sized butter pieces remaining.
- In a small bowl, whisk the beaten egg and vanilla extract together.
- Pour the egg mixture and heavy cream into the flour mixture. Gently fold with a fork or spatula until the dough just comes together; it should look shaggy. Do not knead.
- Turn dough onto a lightly floured surface. Sprinkle raspberries and white chocolate chunks over the dough and gently fold to distribute.
- Pat the dough into an 8-inch circle about 1-inch thick. Cut into 8 wedges with a sharp knife.
- Place wedges on the prepared baking sheet and chill in the refrigerator for 15-30 minutes.
- Bake for 18-20 minutes until golden brown on top and firm to the touch.
- Cool on the pan for 5 minutes, then transfer to a wire rack to cool completely or serve warm.
Notes
Keep all ingredients cold for flaky layers. Use frozen raspberries to prevent soggy dough; do not thaw them. If using fresh raspberries, toss them in flour first. Do not overmix the dough to avoid tough scones. For a golden top, brush with extra heavy cream before baking.
- Prep Time: 15 minutes
- Cook Time: 20 minutes
- Category: Breakfast
- Cuisine: American
Nutrition
- Serving Size: 1 scone
- Calories: 380
- Sugar: 18
- Fat: 20
- Saturated Fat: 12
- Carbohydrates: 42
- Fiber: 2
- Protein: 5
Keywords: raspberry scones, white chocolate scones, bakery style scones, homemade scones, breakfast recipe, easy baking


