There was a Tuesday last October when I stared into the fridge for a full five minutes, completely paralyzed. The kids had already eaten breakfast, the dog was begging for scraps, and I had exactly twelve minutes before I needed to leave for work. In that moment, I wasn’t thinking about nutrition or balanced meals. I was thinking about survival. I grabbed a granola bar, threw a banana in a bag, and prayed no one noticed the sad, squashed apple at the bottom.
That was the breaking point. I realized I was spending too much money on convenience and too much time feeling guilty about the quality of what I was packing. My kids are picky—like, genuinely picky—and they’d rather eat dry cereal for lunch than anything I made if it looked “fussy.” But I also didn’t want to spend my entire morning assembling sandwiches while rushing out the door.
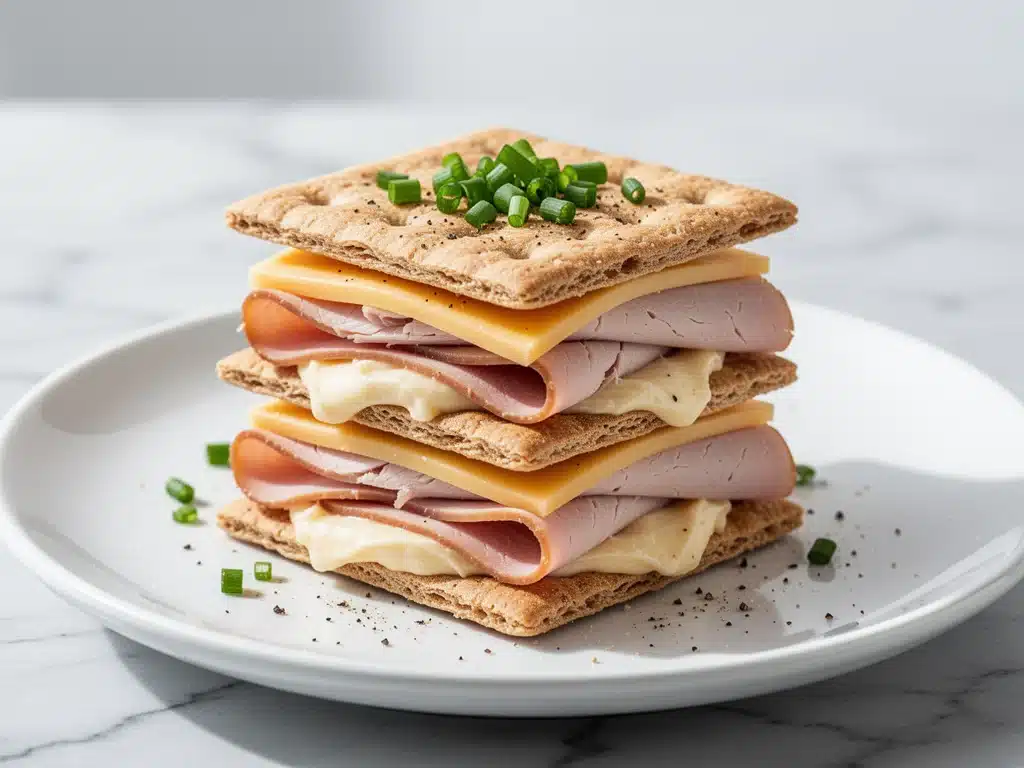
That’s when I stumbled onto the idea for these homemade turkey and cheddar lunchbox stackers. It started as a hack to use up leftover deli turkey and a block of cheddar that was slowly drying out in the crisper drawer. I wasn’t trying to reinvent the wheel. I just wanted something that looked cute enough to get excited about, tasted good enough to actually eat, and could be assembled in under five minutes while my coffee brewed.
What I found was a game-changer. These stackers are crispy, cheesy, and surprisingly filling. They fit perfectly into small lunchboxes, they don’t make a mess, and best of all, they take less time than assembling a standard sandwich. I’ve been making them nearly every week for three months now, and my kids have actually asked for them by name. If you’re tired of the lunchbox blues, you need to try this.
Why You’ll Love This Recipe
Look, I know your time is limited. You’re juggling work, school runs, and probably a million other things. This recipe respects your time while still delivering food that feels homemade and special. Here’s why these stackers have earned a permanent spot in our weekly rotation:
- Stupidly Fast Assembly — Seriously, if you can stack things, you can make this. I’ve made these while on the phone with my boss. It takes about 5 minutes of active time, and most of that is just grabbing ingredients from the fridge.
- Zero Mess, Maximum Flavor — Traditional sandwiches fall apart in lunchboxes. These stackers hold their shape perfectly. The cheese melts into the turkey and bread, creating a cohesive bite that doesn’t slide around.
- Picky-Eater Approved — My daughter, who usually rejects anything with “filling,” devours these. The crispy edges and sharp cheddar make it feel like a treat, not a health food.
- Pantry and Fridge Friendly — You likely have everything you need right now. Bread, deli turkey, cheddar, and maybe some mustard or mayo. That’s it. No obscure ingredients needed.
- Budget-Smart — Deli meat can be pricey, but these stackers use thin slices efficiently. Plus, I often use up leftover cheddar that would otherwise expire. It’s a great way to stretch your grocery budget.
- Make-Ahead Friendly — I assemble a batch on Sunday night, and they last in the fridge for up to three days. This is the holy grail for busy mornings when you just want to grab and go.
This is my go-to when I need lunch to just work. No complicated techniques, no weird ingredients, just reliable, delicious food that makes everyone happy.
Ingredients You’ll Need
Here’s the best part: you probably have most of this already. I’m particular about two things here—the cheese and the bread—but everything else is flexible.
The Basics
Sliced bread (8 slices) — I use whole wheat for a bit of nuttiness, but white bread works too if you prefer a softer texture. Avoid thick artisan loaves; you want standard sandwich bread for easy stacking and cutting. I like homemade banana bread for snacks, but for lunch, standard sliced bread is key.
Deli turkey (16 slices) — Look for low-sodium turkey if you can find it. It tastes cleaner and lets the cheese shine. If you’re using thick-cut turkey, you might need fewer slices, but standard thin deli slices work best here. Don’t skimp on the quality; you’re eating it cold.
Cheddar cheese (8 slices) — Sharp cheddar is non-negotiable for me. Mild cheddar gets lost in the bread. Sharp cheddar has that tangy punch that cuts through the richness of the turkey. I buy the pre-sliced blocks because I’m not a hero, but if you have a sharp block, grate it yourself for better melting.
Butter or mayonnaise (2 tablespoons) — This is the secret weapon. I use softened butter for a savory, crispy exterior. If you prefer a softer sandwich, use mayo. Either way, it goes on the outside of the bread to help it brown.
The Optional Boosters

Yellow mustard (1 teaspoon) — Just a smear on the inside adds a tangy kick. I use it sparingly because I don’t want the bread to get soggy. If you hate mustard, skip it or swap for a thin layer of mayo on the inside.
Tomato slices (4 thin slices) — Only if you’re eating these immediately. Tomato adds moisture and acidity, but it can make the bread soggy if packed for later. For make-ahead lunches, skip the tomato.
Arugula or spinach (1 handful) — Adds a nice peppery crunch. I add this if I want to sneak in some greens. It holds up well in the fridge.
Substitutions
Can’t find deli turkey? Use leftover roasted turkey from dinner. It works just as well. No cheddar? Pepper Jack adds spice, and American cheese makes it more kid-friendly (though less gourmet). Whole wheat bread? Great choice for extra fiber. Just keep in mind that darker breads might dominate the flavor slightly.
Equipment Needed
You don’t need fancy equipment for this. Here’s what I actually use:
Small skillet or griddle — I use a 10-inch non-stick skillet. It’s the perfect size for these smaller stackers. If you don’t have a small skillet, a regular one works, but you might need to cook them in batches.
Spatula — A thin, flexible spatula is best for flipping these delicate stackers without breaking them. I have a silicone one that’s cheap and does the job perfectly.
Sharp knife — For cutting the stackers into quarters or triangles. A serrated knife works if your bread is soft, but a standard chef’s knife is fine for standard sandwich bread.
Measuring spoons — For the butter and mustard. I eyeball it most of the time, but having them handy helps if you’re being precise.
Lunch containers — I use bento-style boxes with dividers to keep the stackers from touching each other. This prevents them from sticking together and keeps them looking neat. Any small container works, though.
Tool Tips
Don’t have a small skillet? Use your largest one and cook fewer at a time. I’m obsessed with my crispy garlic chicken skillet, but any non-stick pan works for this. Make sure your butter is softened; cold butter won’t spread evenly and will burn in spots.
How to Make It: Step-by-Step
Alright, let’s make this! I’m walking you through exactly how I do it, including the little tricks I’ve picked up over the last few months.
Step 1: Prep Your Ingredients (2 minutes)
Before you start cooking, lay out all your ingredients. Take the butter out of the fridge and let it soften for a few minutes. If you’re using mustard, squeeze it into a small bowl. This makes the actual assembly way less stressful. Once you start cooking, things move fast.
Step 2: Assemble the Stackers (3 minutes)
Take two slices of bread. On one slice, layer 4-5 slices of turkey. Fold them loosely so they don’t stick out the edges. Place a slice of cheddar cheese on top of the turkey. If you’re adding mustard, spread a thin layer on the inside of the second slice of bread. Place the second slice on top, butter-side down. Press down gently to help the cheese stick to the turkey.
Step 3: Butter the Outside
Flip the sandwich over. Now, spread a thin layer of softened butter on the top slice of bread. This is crucial for getting that golden, crispy exterior. Make sure you cover every edge. If you’re using mayo, spread it here instead.
Step 4: Cook the Stackers (4-5 minutes)
Heat your skillet over medium-low heat. Add the stacker butter-side down. Cook for 2-3 minutes until the bottom is golden brown. You’ll know it’s ready when you see the cheese peeking out the sides and the bread is crisp. Carefully flip the stacker. Cook for another 2-3 minutes until the second side is golden and the cheese is melted. If the bread is browning too fast, lower the heat.
Step 5: Cut and Serve
Remove from the skillet and let cool for 1 minute. This helps the cheese set slightly so it doesn’t ooze out when you cut. Cut into quarters or triangles. Serve immediately or pack for lunch.
Total Time: About 10 minutes (5 minutes prep, 5 minutes cooking)
Built-in Troubleshooting
Stacker falling apart? You didn’t press the cheese enough to the turkey. Press down gently after adding the cheese to help it adhere. Also, don’t overload with turkey; 4-5 slices is the sweet spot.
Bread burning before cheese melts? Heat is too high. Lower the heat to medium-low and cover the skillet with a lid for the last minute to help the cheese melt without burning the bread.
Soggy bread? You used too much butter or mayo. Use a thin layer. Also, avoid adding wet ingredients like tomato if packing for later.
Expert Tips & Tricks
Here’s everything I’ve learned from making this dozens of times. These tips will save you from my mistakes.
The Game-Changers
Use Sharp Cheddar
This is the #1 tip. Mild cheddar tastes bland in cold sandwiches. Sharp cheddar has enough flavor to stand up to the turkey and bread. I learned this the hard way with a bland sandwich that my kids pushed around their plate.
Press the Cheese
When you add the cheese to the turkey, press it down gently. This helps it stick to the meat, so it doesn’t slide off when you flip the stacker. It’s a small step that makes a big difference in presentation.
Low and Slow
Cook these over medium-low heat. High heat burns the bread before the cheese melts. I’ve burned more stackers than I care to admit. Patience pays off with a perfectly golden, melty interior.
Butter, Not Oil
Butter gives a richer, more savory flavor and helps the bread brown evenly. Oil can make the bread greasy. If you’re dairy-free, use a dairy-free butter alternative, but regular butter is best for flavor.
Common Mistakes
Mistake: Overcrowding the pan
Fix: Cook in batches. If you crowd the pan, the stackers steam instead of fry. They won’t get crispy.
Mistake: Using cold butter
Fix: Soften your butter first. Cold butter tears the bread and doesn’t spread evenly. Take it out 10 minutes before you start.
Mistake: Adding too much turkey
Fix: 4-5 slices is enough. Too much turkey makes the stacker tall and unstable, leading to messy bites.
Pro Tricks I’ve Learned
For Extra Crispiness
Add a pinch of garlic powder to the butter. It adds a subtle savory note that pairs perfectly with cheddar.
For Better Texture
Toast the bread lightly before assembling if you prefer a crunchier texture. This also helps prevent sogginess.
Make-Ahead Strategy
Assemble the stackers without cooking, wrap them tightly in plastic wrap, and refrigerate for up to 24 hours. Cook them fresh in the morning. This saves even more time on busy days.
Variations & Substitutions
Once you’ve nailed the basic version, here’s how you can mix it up. I’ve tried all of these.
Tested Variations
Ham and Swiss Version
Swap turkey for ham and cheddar for Swiss cheese. Add a thin layer of Dijon mustard. This is a classic combination that my husband loves.
Veggie Delight
Add thin slices of cucumber and tomato inside. Use spinach instead of arugula. This version is lighter and fresher, perfect for spring.
Spicy Kick
Add pepper jack cheese and a slice of jalapeño. This is for when I want a bit of heat in my lunch. My older kid likes this one.
Bacon Lover’s
Add a slice of crispy bacon inside. This makes it feel like a club sandwich. It’s richer but worth the extra effort.
Dietary Modifications
Gluten-Free
Use gluten-free bread. Everything else is naturally gluten-free. I’ve used crispy garlic chicken style breading for inspiration, but for this, standard gluten-free bread works well. Just be careful it doesn’t tear when flipping.
Dairy-Free
Replace cheddar with dairy-free cheese slices and butter with olive oil or dairy-free spread. It’s different but still tasty. My lactose-intolerant friend requests this version.
Lower-Carb
Use low-carb wraps instead of bread. Roll the turkey and cheese inside the wrap. It’s not the same texture, but it works if you’re watching carbs.
Different Proteins
– Roast beef (thinly sliced)
– Turkey breast (leftover roasted)
– Ham (thinly sliced)
– Chicken breast (leftover grilled, shredded)
Serving & Storage
I usually serve these straight from the skillet at the dinner table—it looks rustic and stays warm. But here are other ways I’ve enjoyed them:
How to Serve
With Soup
These stackers are perfect with a bowl of tomato soup or chili. The crispy bread soaks up the soup nicely.
With Salad
Serve with a simple green salad and balsamic vinaigrette. The savory stackers balance the fresh salad.
With Pickles
A dill pickle spear on the side adds a nice tangy crunch.
Storage Instructions
Refrigerator:
Store in an airtight container for up to 3 days. Keep them separate with parchment paper to prevent sticking. They stay fresh and tasty.
Reheating:
Best method: Reheat in a skillet over medium-low heat for 2-3 minutes per side. This restores the crispiness.
Microwave method: Heat for 30 seconds. Note: This will make the bread soft, so skip if you want crispiness.
Freezing:
Honestly, this doesn’t freeze well because of the bread and cheese. The texture suffers. Make it fresh or store in the fridge for up to 3 days.
Pro tip: If leftovers are drying out, reheat with a lid on the skillet to trap steam. This helps keep the bread soft.
Nutrition Information
I’m not a nutritionist, but here’s the breakdown if you’re tracking.
Per Serving (based on 4 stackers, 1 stacker per serving):
- Calories: 280
- Protein: 18g
- Carbs: 22g
- Fiber: 2g
- Sugar: 3g
- Fat: 12g
- Saturated Fat: 6g
- Cholesterol: 45mg
- Sodium: 650mg
- Calcium: 200mg
What’s Good:
– Decent protein from turkey and cheese
– Calcium from the cheese
– Can add vegetables to boost nutrition
– More filling than it looks
What to Know:
– Higher in calories from cheese and butter
– Contains dairy and gluten
– Moderate sodium (use low-sodium turkey to reduce)
My Take:
Look, this is comfort food. It’s not a diet recipe. But it’s way better than takeout, costs less, and I know exactly what’s in it. When I want to make it lighter, I use whole wheat bread and less butter. But usually? I just eat a reasonable portion and enjoy it.
Final Thoughts
So that’s my go-to homemade turkey and cheddar lunchbox stackers! I’ve probably talked your ear off at this point, but when you make a recipe this often, you have a lot to say about it.
This has saved weeknight lunches more times than I can count. It’s my answer to “what’s for lunch” when I’m tired, don’t want to order out, and still want something that tastes really good. My kids are happy, my husband’s happy, and I’m happy because I’m not stressed about cooking.
Make it yours! Try different add-ins, swap in your favorite vegetables, adjust the cheese (though sharp cheddar is always better in my opinion). The best recipes are the ones you adapt to your family’s tastes.
If you make this, drop a comment and let me know what you think! I love hearing how recipes turn out in your kitchen. And if something doesn’t work, tell me that too—I’m here to help troubleshoot.
Happy cooking! And I hope your kitchen smells half as good as mine does right now.
Frequently Asked Questions
Can I use whole wheat bread?
Yes, absolutely! Whole wheat bread adds a nice nutty flavor and extra fiber. Just be aware that it might dominate the taste slightly, so use a strong cheddar to balance it. I use whole wheat most of the time.
Why did my stacker fall apart?
Usually, this means you didn’t press the cheese enough to the turkey. Press down gently after adding the cheese to help it stick. Also, don’t overload with turkey; 4-5 slices is the sweet spot. If it’s still falling apart, add a thin layer of mustard or mayo to act as glue.
Can I make these ahead for the week?
Yes! Assemble them on Sunday, wrap them tightly in plastic wrap, and store in the fridge. Cook them fresh in the morning. This saves even more time on busy days. They’ll hold up well for 2-3 days.
Why did my bread burn?
The heat was too high. Cook these over medium-low heat. High heat burns the bread before the cheese melts. If the bread is browning too fast, lower the heat and cover the skillet with a lid for the last minute to help the cheese melt without burning the bread.
Can I use pre-shredded cheese?
You can, but pre-shredded cheese has anti-caking agents that prevent it from melting smoothly. Slice cheese melts better and gives a creamier texture. If you must use pre-shredded, mix it with a little cornstarch to help it melt, but slice cheese is best.
How do I reheat leftovers without them getting soggy?
Reheat in a skillet over medium-low heat for 2-3 minutes per side. This restores the crispiness. Microwave heating will make the bread soft, so skip if you want crispiness. If you must microwave, do it for 30 seconds and eat immediately.
Can I freeze these?
Honestly, this doesn’t freeze well because of the bread and cheese. The texture suffers. Make it fresh or store in the fridge for up to 3 days. Freezing is not recommended.
Pin This Recipe!


Homemade Turkey Stackers: 5-Minute Easy Lunch
- Total Time: 10 minutes
- Yield: 4 servings 1x
Description
Crispy, cheesy, and surprisingly filling turkey and cheddar stackers that are perfect for busy mornings. These lunchbox-friendly sandwiches are assembled in under five minutes and cooked to golden perfection.
Ingredients
- 8 slices sliced bread (whole wheat or white)
- 16 slices deli turkey (low-sodium recommended)
- 8 slices sharp cheddar cheese
- 2 tablespoons softened butter (or mayonnaise)
- 1 teaspoon yellow mustard (optional)
- 4 thin tomato slices (optional, for immediate consumption)
- 1 handful arugula or spinach (optional)
Instructions
- Prep ingredients: Let butter soften and squeeze mustard into a small bowl if using.
- Assemble stackers: Place 4-5 slices of turkey on one bread slice, folding loosely. Top with a slice of cheddar. Spread mustard on the inside of the second bread slice if desired.
- Close sandwich: Place the second bread slice on top, butter-side down. Press down gently to help the cheese adhere to the turkey.
- Butter outside: Flip the sandwich over and spread a thin layer of softened butter on the top slice of bread, covering all edges.
- Cook: Heat a skillet over medium-low heat. Place stacker butter-side down and cook for 2-3 minutes until golden brown.
- Flip and finish: Carefully flip the stacker and cook for another 2-3 minutes until the second side is golden and cheese is melted. Lower heat if browning too fast.
- Cut and serve: Remove from skillet, let cool for 1 minute to set the cheese, then cut into quarters or triangles.
Notes
Use sharp cheddar for better flavor. Press the cheese gently to help it stick to the turkey. Cook over medium-low heat to prevent burning the bread before the cheese melts. Do not freeze as the texture suffers. For make-ahead, assemble without cooking, wrap tightly, and refrigerate for up to 24 hours before cooking.
- Prep Time: 5 minutes
- Cook Time: 5 minutes
- Category: Lunch
- Cuisine: American
Nutrition
- Serving Size: 1 stacker
- Calories: 280
- Sugar: 3
- Sodium: 650
- Fat: 12
- Saturated Fat: 6
- Carbohydrates: 22
- Fiber: 2
- Protein: 18
Keywords: turkey stackers, quick lunch, kid-friendly lunch, grilled cheese alternative, meal prep, easy lunchbox ideas, turkey and cheddar


